Ever found an old VHS tape or home video and wished you could bring it back to life in HD? Maybe it’s footage of your childhood birthday parties, your parents’ wedding, or those family vacations that now exist only in increasingly fragile analog formats. There’s something uniquely heartbreaking about knowing those precious memories are slowly degrading with each passing year.
Video restoration improves the quality of old, damaged, or low-resolution videos, transforming them from grainy, faded memories into crisp, vibrant keepsakes you can enjoy for generations. With the right tools and techniques, even severely damaged footage can often be salvaged, preserving moments that might otherwise be lost forever.
In this comprehensive guide, I’ll walk you through everything you need to know about video restoration, from DIY tools you can use at home to online services that simplify the process. You’ll discover exactly what restoration can and can’t fix, learn step-by-step techniques for common problems, and understand when to tackle restoration yourself versus when it might be time to call in the professionals for those truly precious or severely damaged recordings.
What Is Video Restoration?
Video restoration encompasses several techniques to repair and enhance video footage that has degraded over time or was originally recorded with technological limitations. This process typically addresses issues like:
- Color correction for faded or discolored footage (fixing the notorious red/magenta shift of aged VHS)
- Noise reduction to eliminate static, grain, and digital artifacts that obscure details
- Image sharpening to improve clarity and definition in soft or blurry recordings
- Frame rate correction to smooth out jerky movement or fix dropped frames
- Audio enhancement to reduce hiss, crackle, or distortion in soundtracks
“Video restoration is about more than just making old footage look better; it’s about preserving the emotional essence of memories that might otherwise be lost to time,” says James Wilson, a video preservation specialist at the American Film Institute. Common issues with older videos include color shifts, static, low resolution, VHS tracking errors, and audio sync problems. Even early digital files often suffer from pixelation and heavy compression.
Different formats degrade differently. VHS tapes lose magnetic quality, 8mm film gets scratched or fades, and early digital formats show artifacts. Modern AI-powered tools can restore these memories with surprising clarity and emotional impact.
Can You Do Video Restoration Yourself?
The good news is that yes, you absolutely can restore many videos yourself, thanks to modern software and apps that have made the process more accessible than ever before. The democratization of video restoration tools means that what once required expensive equipment and specialized training can often be accomplished with consumer software and a decent computer.
DIY video restoration is generally suitable when:
- You’re working with already digitized videos (or can easily digitize them)
- The footage has minor to moderate quality issues, like slight color fading or noise
- You have some basic technical comfort with software interfaces
- You’re willing to spend time learning the tools and applying effects carefully
However, you might want to consider professional help when:
- Your videos exist only on damaged physical media (broken tapes, moldy film, etc.)
- Footage has severe distortion, tracking problems, or color loss that requires frame-by-frame work.
- The content is irreplaceable and high-stakes (wedding videos, historical footage, last recordings of departed loved ones)
- You need results that match professional broadcast quality.
Your comfort with technology should also factor into your decision. Many modern tools have simplified their interfaces substantially, but restoration requires patience and attention to detail. If you’re comfortable adjusting settings and comparing results, DIY restoration can be rewarding and cost-effective.
DIY Video Restoration Tools and Software
Whether you’re a beginner or have some editing experience, there’s a tool that will match your skill level and restoration needs. The landscape of restoration software has expanded dramatically in recent years, with options ranging from free basic tools to sophisticated professional suites.
Free and Paid Tools:
1. VLC Media Player
This free, open-source media player includes basic filters that adjust real-time brightness, contrast, and saturation. While not a full restoration suite, it’s perfect for quick fixes and previewing what might be possible. Access these features through Tools > Effects and Filters > Video Effects. VLC can also help stabilize playback issues with problematic files.
2. Topaz Video AI
Perhaps the most revolutionary tool in recent years, Topaz uses artificial intelligence to upscale footage to HD or even 4K quality, reduce noise, and stabilize shaky footage. At $299, it’s an investment, but the results can be remarkable for home videos. Its strength lies in its ability to “intelligently” add detail that was never captured in the original recording. Particularly effective for VHS-to-digital conversions.
3. DaVinci Resolve
With a robust free version, this professional color grading software can work wonders on faded colors. The learning curve is steeper, but the results can match professional studios. The “Color” tab provides powerful tools for color correction that can dramatically improve faded footage. The Studio version ($295 one-time purchase) adds noise reduction and motion estimation capabilities.
4. Adobe Premiere Pro
The industry standard for video editing includes numerous restoration effects and plugins. Available on subscription (around $21/month), it offers comprehensive tools for serious restoration work. The Lumetri Color panel and third-party plugins like Red Giant’s Magic Bullet Suite can address nearly any restoration challenge. Its integration with After Effects adds additional restoration possibilities.
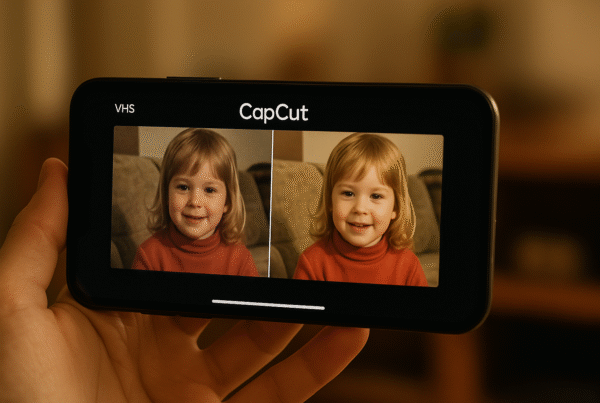
5. iMovie or CapCut
For beginners on a budget, these free editors offer basic stabilization, color correction, and noise reduction features that can significantly improve video quality. While limited compared to professional tools, they’re surprisingly capable of addressing common issues in home videos.
6. Handbrake
This free, open-source video transcoder is excellent for converting between formats while applying basic filters. Its denoise filters can significantly improve digital video quality.
7. VSDC Free Video Editor
A feature-rich free option that includes noise reduction, stability correction, and color adjustment tools that are more powerful than most free alternatives.
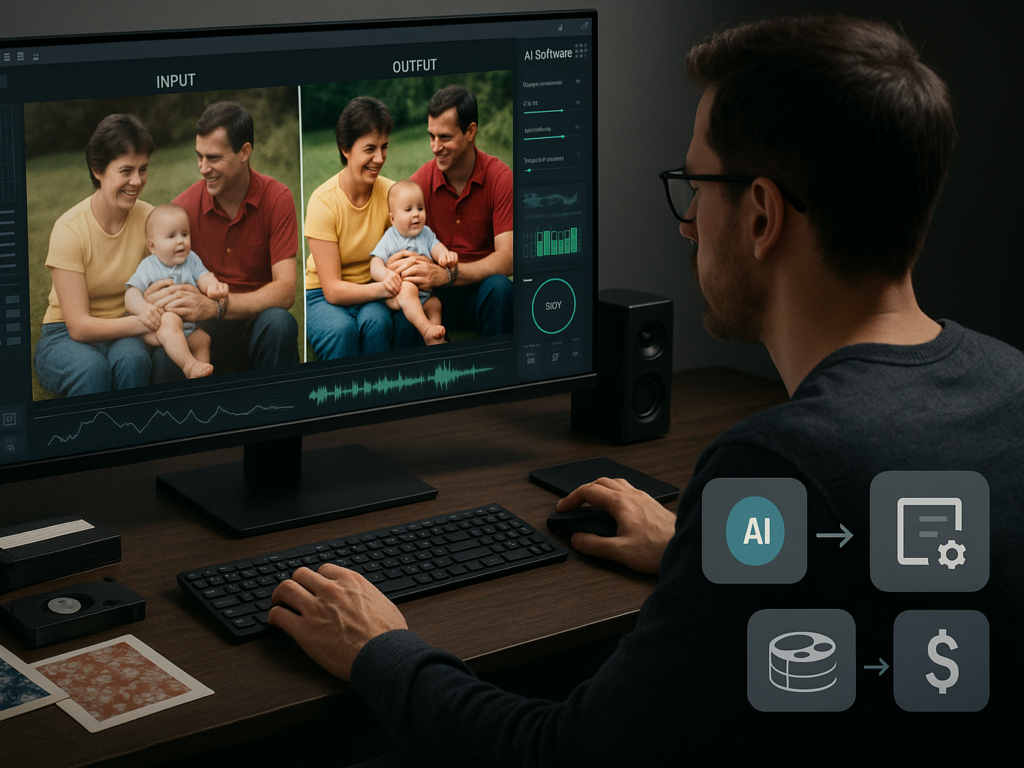
As shared in Digital Trends’ analysis of video enhancement software, AI-based enhancement technology has made extraordinary advances in the past three years, with neural networks now capable of “hallucinating” detail that wasn’t visible in the original footage. Once available only to Hollywood studios, this technology is now accessible to consumers through software like Topaz Video AI, which can make VHS footage appear as if it were shot in HD.
Tips for DIY Success:
- Always work from the highest quality source available. If you have multiple copies, use the best one.
- Save your original file and work on a copy; never overwrite your source material.
- Apply effects gradually; subtle changes often yield more natural results.
- Avoid over-sharpening, which can create unnatural edges and artifacts.
- Balancing noise reduction with detail preservation, too much noise reduction can make footage look artificially smooth.
“The biggest mistake amateurs make is overdoing effects,” warns Thomas Reed, restoration expert at Memory Recovery Labs. “When in doubt, err on the side of subtlety. You want viewers to notice the content, not your restoration techniques. I recommend creating at least three versions of each restoration: minimal correction, moderate enhancement, and aggressive restoration. Then compare them before deciding which feels most authentic and pleasing.”
How to Do Video Restoration Online (No Software Needed)
If downloading and learning specialized software sounds daunting, several excellent services can handle video restoration online with minimal technical knowledge required. These cloud-based platforms have dramatically improved in recent years, offering capabilities rivaling desktop applications.
These cloud-based tools are perfect for:
- Quick enhancements without a learning curve
- Projects when you don’t have access to your main computer
- Testing what’s possible before investing in desktop software
- Processing videos when your computer lacks the necessary power
- Handling occasional restoration needs without software investment
- Collaborating with others on restoration projects
Top Online Restoration Services:
1. Pixop
This AI-powered platform specializes in enhancing old and low-resolution videos. With intuitive sliders for different enhancement parameters, it’s remarkably user-friendly while delivering professional-quality results. Their Film Grain Removal and Detail Enhancement tools are particularly effective for VHS footage. Pricing is based on processing minutes, starting at about $10 for 30 minutes of video.
2. Veed.io
More than just a video editor, Veed includes noise reduction, stabilization, and color enhancement tools that work entirely in your browser, making it a standout option for video restoration online. Its strength lies in its simplicity; most enhancements can be applied with easy slider controls. The free version limits output resolution, while paid plans start at $18/month.
3. Clideo
Offers free basic enhancements with a straightforward interface, making it perfect for beginners or quick fixes. The free version adds a watermark, which can be removed with a subscription starting at $9/ 9/month.
4. RunwayML
Known for its AI capabilities, Runway offers impressive restoration features, including noise reduction and upscaling. Its “Clean Audio” feature is particularly effective for improving old soundtracks. Subscription starts at $15/month.
5. Algorithmia
It provides API-based enhancement services that can be accessed through its web interface. Their Super Resolution algorithm is particularly effective for upscaling low-resolution footage. Pay-as-you-go pricing makes it economical for occasional use.
Pros & Cons:
| Pros | Cons |
| No software installation required | Monthly subscriptions can add up |
| Accessible from any device with internet | Limited control over fine adjustments |
| Beginner-friendly interfaces | Privacy concerns with uploading personal videos |
| Automatic cloud backup | Dependent on the internet connection speed |
| Regular updates without manual downloads | May compress results when downloading |
| No high-end hardware required | Processing time depends on server load |
| Often includes useful templates and presets | File size limitations on uploads |
| Easier sharing of results | Less suitable for batch processing |
“Cloud-based restoration services have democratized access to professional-grade tools,” explains Dr. Hannah Martinez, digital media preservation expert. “These platforms leverage economies of scale to provide access to the same AI algorithms used by major studios, but at consumer-friendly prices. For most home users with occasional restoration needs, online services provide better results than trying to master complex desktop software.”
How to Restore Analog Tapes (VHS, MiniDV, 8mm)
Analog formats present unique challenges but offer some of the most rewarding restoration opportunities. Unlike digital video, which may have hard-coded compression artifacts, analog sources often contain more recoverable information than is immediately apparent.
Step 1: Digitize your tape
Before you can enhance analog footage, you must convert it to a digital format. It requires either:
- A VHS-to-USB converter (like the Roxio Easy VHS to DVD or Elgato Video Capture)
- A camcorder that can play your tapes connected to a capture device
- A professional digitization service
For best results, use the highest quality settings your equipment allows. Capture in the highest resolution available (usually 720×480 for VHS) and use lossless or high-bitrate formats for the initial capture. Many capture devices include basic software, but you can also use OBS Studio (free) for more control over the capture process.
Important: Clean your playback heads before digitizing. You’d be surprised how much difference this simple step can make. VHS head cleaners and cleaning kits for other formats are still available online.
Step 2: Import the footage
Once digitized, import your video into your chosen editing software. At this stage, avoid any automatic “enhancements” that might permanently alter your base file. Create a project that matches your capture resolution, but don’t immediately try to upgrade to HD or 4 K.
If your capture includes multiple clips or videos, consider separating them into individual files for more targeted restoration work. Label everything clearly with dates and content descriptions to maintain organization.
Step 3: Apply restoration techniques
Now you can begin the restoration process using the software tools mentioned earlier. For analog footage, focus first on:
- Stabilization (especially for handheld footage)
- Noise reduction (for the characteristic VHS “snow”)
- Color correction (to address the typical magenta or green shifts)
- Tracking error correction (for horizontal distortions)
- Audio cleanup (reducing hiss and wow/flutter)
Work in passes, saving intermediate versions. For example:
- First pass: Fix major technical issues (tracking, severe color shifts)
- Second pass: Reduce noise and enhance clarity
- Third pass: Fine-tune color and contrast
- Fourth pass: Address audio issues
- Final pass: Output at desired resolution/format
For VHS tapes with serious tracking issues, try digitizing the same tape multiple times using different VCRs. Different playback equipment can sometimes read portions of the tape that others cannot, allowing you to combine the best sections.
Tips for Specific Formats:
1. VHS Restoration
- Use a high-quality VCR for digitization. Later models from the late 1990s often have better playback capabilities
- Try different playback speeds if a tape has tracking issues
- Don’t fast-forward or rewind old tapes before playing through them first
- For severe color bleeding, try separating the RGB channels in your editing software and correcting each individually
2. 8mm and Hi8 Video
- These formats often suffer from vertical jitter, so look for stabilization tools specifically designed for this
- Color tends to fade toward blue or green, and warming filters can help counteract this
- Consider tracking down the original camcorder for digitization if possible
3. MiniDV Restoration
- These digital tapes often have dropout issues that appear as digital blocks.
- Frame interpolation can help fill in missing data.
- Audio sync issues are common, so be prepared to realign the sound.
- Use the FireWire/IEEE 1394 connection if your computer supports it for the highest quality capture.
When Should You Hire a Professional?
While DIY tools have come a long way, certain situations demand professional expertise. When your footage contains irreplaceable memories, shows severe degradation, or requires specialized handling, investing in professional restoration is often worth the cost. “Professional restoration isn’t just about having better equipment, it’s about experience with thousands of hours of problematic footage,” notes Sam Rodriguez, chief technician at Memory Lane Restoration.
- Specialized services like Legacybox and iMemories offer comprehensive restoration packages, ranging from $20-40 per tape for basic digitization and $50-200 for advanced restoration. Most services deliver results within 3-6 weeks.
- Local digitization centers often provide more personalized service with faster turnaround times (sometimes as quick as 48 hours), though prices may be 15-20% higher than mail-in services.
- Professional studios can tackle the most severely damaged media using frame-by-frame correction methods, specialized cleaning techniques, and custom software solutions. These premium services typically start at $250 per tape with 2-3 month turnaround times.
As highlighted by Video Conversion Experts, professional services can recover detail from tapes that appear completely unwatchable to the untrained eye. When evaluating services, look for before/after samples, clear pricing, and reviews specifically mentioning restoration quality rather than just basic digitization.
Final Tips for Preserving Restored Videos
Once you’ve invested time restoring your videos, proper preservation ensures they remain accessible for generations. “The preservation work doesn’t end with restoration,” advises Dr. Michael Chang, digital archivist at the National Media Museum. “Digital files require active maintenance to avoid becoming inaccessible as technology evolves.”
- Use optimal file formats for long-term storage, such as .mp4 (H.264/H.265 codec) or .mov, which balance quality with compatibility. Save in high resolution while creating separate, compressed copies for easy sharing with family.
- Implement the 3-2-1 backup strategy: maintain three copies of your videos on two different media types (external drive + cloud storage), with one copy stored off-site to protect against physical disasters.
- Add essential metadata to your files, including dates, locations, names, and context. This information becomes increasingly valuable as the original storytellers can no longer provide background details.
As the Library of Congress digital preservation guidelines highlight, schedule regular media migrations every 5-7 years as technology standards evolve to prevent your precious memories from becoming trapped in obsolete formats.
Conclusion
Whether you choose the DIY route with powerful software tools, opt for the convenience of online restoration services, or entrust your precious memories to professionals, video restoration can breathe new life into footage you might have thought was lost forever.
Today’s technology makes it possible to preserve these moments and enhance them beyond what was possible when they were originally recorded. Even modest improvements can make the difference between videos that gather digital dust and memories that continue to be shared and enjoyed.
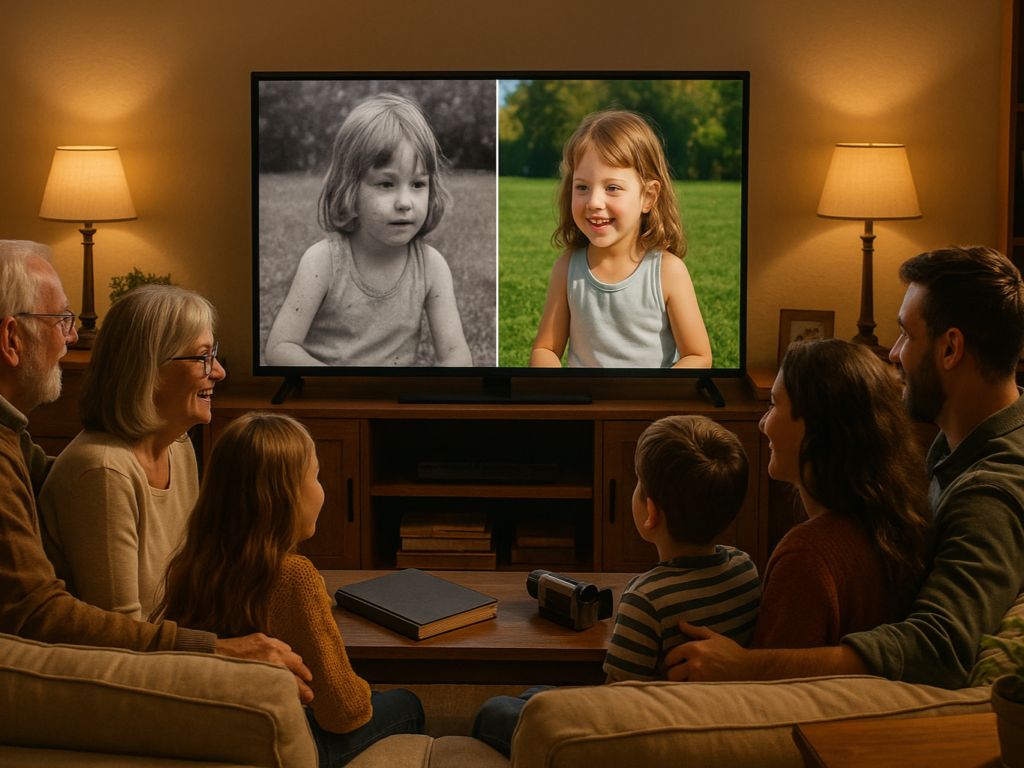
You should start small with a single clip that’s meaningful but not irreplaceable to practice your restoration skills. Once you see the dramatic before-and-after difference, you’ll likely be motivated to rescue more of your video history from the ravages of time.
Ready to bring your memories back to life? Pick one video this week and try a free restoration tool. Then share your before-and-after results with family members. I guarantee their reactions will be worth the effort!