Your childhood memories are fading. VHS video restoration has become essential because those precious home movies recorded on magnetic tape are susceptible to the ire of Father Time. After all, moisture, mold, and simple aging can destroy irreplaceable memories captured on these analog formats.
Nearly 40% of American households have attempted to rescue their home videos using software or online services, making VHS video restoration one of the most sought-after digital preservation methods today. However, the process isn’t always straightforward; converting a single VHS tape can take hours, and with multiple tapes, this can become a long and laborious process.
Furthermore, the basic video hardware required for quality restoration starts at about \$400 US and can reach \$1200 US for an ideal home setup. Fortunately, whether you’re looking for free VHS video restoration options or professional video restoration software, this comprehensive guide will walk you through powerful methods to breathe new life into your aging tapes in 2025.
Use VHS Video Restoration Apps for Quick Fixes
Looking for a quick way to breathe new life into your old VHS tapes? A VHS video restoration app offers the most accessible entry point into digital preservation. Unlike complex software solutions, these apps provide instant gratification with minimal technical knowledge required. For those exploring professional VHS video restoration services, mobile apps serve as an excellent testing ground before investing in more comprehensive solutions.
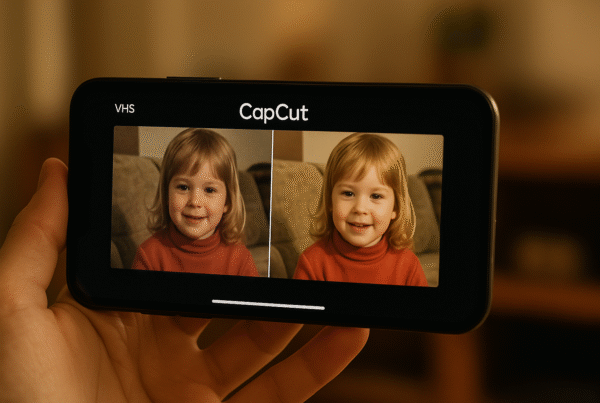
1. VHS video restoration app in 2025: PixVerse, CapCut AI, VHS Camcorder
In 2025, several standout mobile applications have emerged as go-to solutions for VHS restoration:
PixVerse leads the pack with its revolutionary AI technology that transforms static images into dynamic videos in seconds. This app converts photos, text, and videos into extraordinary content with just a few taps, all in approximately 5 seconds. The recently launched v4.5 model delivers unprecedented video quality, smoother animations, and more realistic transformations. PixVerse is perfect for adding motion to digitized VHS stills or enhancing already captured footage.
CapCut AI stands out for its comprehensive enhancement capabilities. This powerful video editor comes equipped with AI tools that can remove camera shakes, reduce background noise, and even automatically add captions. Its AI video enhancer can upscale your videos to high definition, giving you a wider range of export quality options. Additionally, the flicker remover smooths out annoying inconsistencies with a single click, perfect for those old VHS transfers with lighting issues.
VHS Camcorder (also known as Rarevision VHS) remains a popular choice, especially for creating or enhancing the vintage VHS aesthetic. This app has been used by notable creators including Snoop Dogg, Die Antwoord, and SNL. Beyond simple filters, it offers unique modes for different styles and effects, plus zoom lens control along with authentic VHS shakes, glitches, and graphics.
Other notable mentions include Camcorder (free and ad-free for iPhone), Vaporgram (featuring a computerized interface with glitch effects), and Vintage Cam 8mm VHS for cross-purpose VHS and 8mm aesthetics.
Best VHS Video Restoration Apps (2025): Mobile Tools to Revive Old Tapes: Discover the complete breakdown of 2025’s top-rated mobile restoration apps with detailed features, pricing, and user reviews. Get expert recommendations for choosing the perfect app for your specific restoration needs. Read our comprehensive app comparison guide.
2. How mobile apps enhance old footage
Mobile restoration apps employ various techniques to improve your aging VHS content:
- Noise reduction: Removes grain, static, and digital artifacts from poor recordings
- Upscaling: Increases resolution for modern screens
- Deblurring: Enhances image clarity and reduces softness
- Color correction: Restores faded or incorrect colors to more accurate tones
- Stabilization: Fixes shaky footage often found in vintage recordings
CapCut’s AI, for instance, has an impressive array of enhancement capabilities. It can intelligently separate desired audio from unwanted background noise, providing cleaner, clearer audio. The AI video enhancer can also upscale resolution, reducing graininess while enhancing details in cherished moments.
3. Best use cases for casual users
These apps prove most valuable in specific scenarios:
- Quick social media sharing: When you need to digitize and share a nostalgic clip quickly
- Basic cleanup: For removing visual noise and enhancing colors without complex software
- Adding VHS aesthetic: When you want to add that authentic retro VHS look to modern footage
- Preserving family memories: Ideal for casual users wanting to breathe new life into old home videos
For instance, PixVerse has become a social media sensation with trending effects creating viral moments across TikTok, Instagram, Facebook, and Twitter/X. It makes it perfect for users looking to enhance their social media presence with nostalgic content.
4. Limitations of app-based restoration
Despite their convenience, mobile apps have some drawbacks:
Limited processing power: Mobile devices simply can’t match the processing capabilities of dedicated computers, resulting in longer rendering times for complex restorations.
Restricted enhancement capabilities: While apps can perform basic cleanup, they often fall short when dealing with severely damaged footage. As one user noted about trying to restore VHS with AI apps: “I’ve periodically tried to use it for VHS restoration but never been fully satisfied with the results”.
Quality constraints: Many apps cap resolution improvements. For example, CapCut’s online version only supports upscaling to 2K, and excessive smoothing can produce an artificial or plastic-like effect.
Reliability issues: Some users report problems with app stability. CapCut, for instance, has received criticism for lag, crashes, and data loss.
Despite these limitations, choosing the right VHS video restoration app represents an excellent starting point for your preservation journey. They offer accessibility, immediate results, and are typically either free or cost less than $10 per month. Plus, they serve as a perfect entry point before moving on to more sophisticated restoration methods.
Try Free VHS Video Restoration Tools First
Before investing in expensive solutions, explore free VHS video restoration tools that provide robust capabilities without the price tag. These open-source and freeware options provide robust capabilities that can yield impressive results without the price tag, making them perfect for those researching cost-effective VHS restoration methods.
1. OBS Studio for capturing analog footage
OBS Studio stands out as a remarkably versatile free tool for digitizing VHS tapes. Initially designed for streaming, this software excels at capturing analog video when paired with the proper hardware.
To get started, you’ll need:
- A functioning VCR
- RCA cables or S-Video cable (depending on your VCR)
- A USB converter (around $40)
- OBS Studio is installed on your computer
Setting up OBS correctly is crucial for quality captures. For NTSC format (United States), configure your base resolution to 720×480, whereas PAL format users should set it to 720×576. Additionally, adjust your output resolution to 720×540 for NTSC or 768×576 for PAL to correct the aspect ratio for modern displays.
For optimal results, select the appropriate deinterlacing method: “Yadif 2x” with “Top Field First” setting reduces jagged lines during movement. Moreover, changing the Color Space to “601” ensures accurate color reproduction since VHS tapes use the 601 color space standard.
Although some professionals caution that OBS “is not analog capture software” but “digital screen recording software”, many users still find it valuable for initial digitization or bulk capturing footage for previewing.
2. AviSynth and VirtualDub for filtering
Once you’ve captured your footage, AviSynth and VirtualDub offer powerful tools for cleaning and enhancing your VHS recordings.
AviSynth, a script-based video processing tool, excels at applying sophisticated filters through text-based commands. Its specialized plugins, such as LMFlicker, can significantly reduce the flickering often seen in film-to-VHS transfers. For advanced users, QTGMC (a high-quality deinterlacer) removes the interlacing artifacts while preserving detail.
VirtualDub complements AviSynth perfectly as a video processing utility. One restoration expert recommends using these specific filters in VirtualDub:
- Video DeNoise 1.2
- Chroma Noise Reduction
- NRS (Temporal Smoother) with particular settings for optimal noise reduction
One forum user shared their success using “Neat Video with Virtualdub,” noting they “process files on Vdub before exporting out” to their preferred editor. This workflow maintains quality while providing greater control over the restoration process.
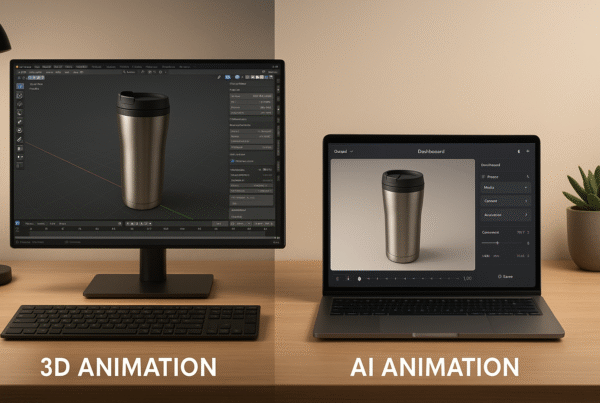
3. Shotcut and Blender for editing
For comprehensive editing capabilities, Shotcut and Blender offer free alternatives to premium software.
Shotcut, an open-source video editor, includes several built-in filters designed explicitly for vintage video restoration. Its “Old Film” effects can simulate dust removal, add grain control, and apply projector-style effects to create authentic-looking restorations. Furthermore, its RGB Shift filter (set between 47-53%) provides realistic color correction for VHS footage.
Blender, primarily known for 3D animation, contains a surprisingly capable Video Sequence Editor with VHS-specific tools. The “blender-vhs-simulator pipeline” includes nodes for:
- Adjusting the aspect ratio to the 4:3 standard
- Simulating color bleed between pixels
- Controlling chroma saturation
- Adding realistic dropouts that mimic tape degradation
Several GitHub repositories offer pre-configured Blender setups specifically for VHS restoration, saving you time in creating complex node structures.
4. Combining tools for a complete workflow
The most effective approach often involves combining these free tools into a cohesive workflow. One expert recommends this process:
- Capture stage: Use OBS Studio with proper settings to digitize your VHS footage
- Initial cleanup: Process through VirtualDub with basic filters
- Deep restoration: Apply AviSynth scripts for noise reduction and deinterlacing
- Final editing: Complete the restoration in Shotcut or Blender with color correction and stabilization
For tough tapes, consider multiple captures. As one restoration expert notes, “capture the video a second time” and align both captures on your editor’s timeline, which can dramatically reduce noise.
To enhance results further, experiment with the “separate fields, trim, weave” technique in AviSynth to fix half-frame offset issues that commonly occur during digitization.
Although these free tools require a steeper learning curve than commercial alternatives, the community support is extensive. Forums like VideoHelp and DigitalFAQ offer detailed guides and scripts specifically for VHS restoration projects.
By mastering these free options first, you’ll not only save money but also gain valuable knowledge about video restoration principles that will serve you well if you later decide to invest in premium solutions.
Complete Free VHS Video Restoration Guide: Best No-Cost Tools in 2025: Master the art of free VHS restoration with our comprehensive guide covering open-source tools, detailed workflows, and expert tips. Save hundreds of dollars while achieving professional-quality results. Access our free restoration toolkit.
Invest in VHS Video Restoration Software for Better Quality
For truly exceptional results with your VHS projects, investing in premium VHS video restoration software offers capabilities far beyond what free tools can deliver. These premium solutions harness advanced algorithms and AI technology to address complex restoration challenges, representing the pinnacle of modern VHS restoration technology.
1. Topaz Video AI: AI upscaling and noise reduction
Topaz Video AI (formerly Topaz Video Enhance AI) stands as the industry leader in AI-powered video restoration. This sophisticated software utilizes machine learning technology to enhance resolution, sharpen details, and dramatically improve video quality.
Key features:
- AI-powered upscaling to resolutions up to 8K
- Advanced noise and grain reduction
- Frame interpolation for smoother playback
- Stabilization for shaky footage
- Face enhancement technology
- Batch processing with GPU acceleration
Topaz Video AI excels at restoring VHS footage through specialized AI models. The Nyx AI model, in particular, delivers impressive results with older films and VHS footage by effectively flattening compression artifacts while preserving sharp edges and fine details. For interlaced VHS videos, the Dione TV and Dione DV models are specifically trained to enhance standard definition sources.
Nevertheless, this power comes at a cost, $299 for a lifetime license with one year of updates, or $149-$179 for renewal options. The software also demands substantial computing resources, requiring Windows 10/11 or macOS Catalina or newer, at least 16GB RAM (32GB recommended), and a dedicated GPU with a minimum of 6GB VRAM.
2. DaVinci Resolve: Color correction and audio sync
DaVinci Resolve offers professional-grade tools that transform faded, off-color VHS footage into vibrant, balanced video. Its comprehensive suite includes temporal and spatial noise reduction plus advanced color correction to restore the vibrancy of aged recordings.
The software’s Super Scale feature, powered by the DaVinci Neural Engine, recovers lost details and improves overall image quality. This tool provides flexible upscaling options, up to 4x the original resolution, with adjustable settings for sharpness and noise reduction.
Restoration workflow:
- Import your digitized VHS footage into a timeline
- Enable Super Scale (2x recommended for VHS)
- Apply noise reduction filters
- Use color correction tools to restore accurate colors
- Fix audio sync issues with precision controls
While not explicitly designed for VHS restoration, DaVinci Resolve’s studio version includes specialized tools like deband, deflicker, and color stabilization that prove invaluable for handling common VHS issues. The combination of these features makes it an excellent choice for users who need both restoration capabilities and comprehensive video editing tools.
VEGAS Pro and Avidemux: Editing and stabilization
VEGAS Pro delivers exceptional stabilization capabilities through its dedicated Video Stabilization plugin. This tool offers three modes, Basic, Professional, and Expert, catering to different skill levels and project requirements.
The Professional mode provides control over stabilization methods with options like:
- Translation (fixes up-down or side-to-side movement)
- Translation + Rotation (addresses camera rotational movement)
- Translation + Rotation + Scale (comprehensive stabilization for handheld footage)
Meanwhile, Avidemux serves as a lightweight yet powerful option for non-linear video editing and transcoding. Though featuring an admittedly outdated interface, this free, cross-platform tool proves valuable for basic filtering and encoding tasks.
Avidemux supports various subtitle formats and offers scripting capabilities through the SpiderMonkey JavaScript engine, allowing for automation of complex restoration workflows. Moreover, it’s built-in filters can address common VHS issues like noise, color bleeding, and artifacts.
Both software options enable you to save complete projects with all settings and preferences intact, making them suitable for long-term restoration projects that require consistent processing across multiple tapes.
Top VHS Video Restoration Software (Free & Paid) for Every Skill Level. Explore detailed reviews of premium restoration software with performance comparisons, system requirements, and step-by-step tutorials. Find the perfect software solution for your technical expertise and budget. Browse our software comparison guide.
Restore Tapes at Home with a DIY Setup
Ready to create your own VHS digitization station? The proper hardware makes all the difference in the quality of your restored footage. While apps and software provide the digital tools for enhancement, you first need to convert those magnetic memories into digital files that your computer can process.
1. What hardware do you need: VCR, capture card, cables
The cornerstone of any DIY VHS restoration setup is quality hardware. At minimum, you’ll need:
(i) VCR (Not Just Any Will Do)
Standard VHS VCRs from brands like Emerson, Magnavox, Philips, GE, and Zenith often produce poor results and may introduce new errors. Instead, consider investing in a Super VHS (S-VHS) VCR with built-in digital noise reduction and time base correctors. JVC models like the HR-S9911U or SR-V10U provide significantly better playback.
(ii) Capture Device
This converts analog signals to a digital format. Options range from basic USB converters ($40-50) to professional capture cards. The DIGITNOW Video Converter and ClearClick Video to Digital 2.0 offer built-in screens for real-time monitoring, while the Elgato Video Capture provides excellent software integration.
(iii) Connection Cables
Quality matters enormously. Basic RCA cables (yellow, red, and white) are the minimum requirement, but gold-insulated Monster cables dramatically improve signal quality. S-Video connections deliver better results than standard composite (RCA) when available.
(iv) Computer
For stable capturing, you’ll need sufficient processing power and storage. Expect 30GB+ per hour for lossless captures. A dedicated setup with at least 16GB of RAM is recommended for serious restoration work.
(v) Time Base Corrector (TBC)
This optional but valuable device corrects timing errors in the video signal. Professional models like the DataVideo TBC-1000 or AVToolbox AVT-8710 significantly improve quality by removing jitter and brightness fluctuations.
The total investment varies considerably. A basic setup costs $50-200, while a comprehensive system with professional-grade equipment can reach $1,200 or more.
2. Step-by-step: Connect, capture, edit, export
Setting up your restoration workstation involves several critical steps:
(i) Connect hardware
Plug your VCR’s output (RCA or S-Video) into your capture device, then connect the capture device to your computer via USB.
(ii) Install software
Most capture devices include basic recording software. Alternatively, use OBS Studio, VirtualDub, or specialized programs like EZ Grabber.
(iii) Prepare your tape
Clean your VHS tape if necessary and test playback before capturing. Adjust the tracking settings on your VCR for optimal picture quality.
(iv) Configure capture settings
Set your software to capture in the highest quality possible. For preservation purposes, capture in uncompressed format initially.
(v) Begin recording:
Start your VCR playback, then initiate recording in your software. The entire process occurs in real-time; a two-hour tape takes two hours to digitize.
(vi) Save and backup:
Immediately save your captured footage and create backups. Digital files are vulnerable to computer crashes or storage failures.
(vii) Edit and enhance:
Use your chosen software tools to clean up the footage, following the methods outlined in earlier sections.
3. Common issues and how to fix them
Even with quality equipment, you may encounter several problems:
(i) Tracking Issues
If you see horizontal lines or poor audio, adjust the tracking controls on your VCR while playing the tape until the picture improves.
(ii) Tape Damage
For physical problems like loose tape, carefully unscrew the cassette’s five screws, gently lift the top, and tighten the reels before reassembling.
(iii) Audio/Video Sync Problems
Common with cheaper converters. Try recapturing at a higher quality setting or use software that allows separate audio adjustment.
(iv) Frame Skipping
Often caused by inadequate computer performance. Close unnecessary programs, capture to a fast internal drive, and consider using a dedicated computer for capturing.
(v) Poor Image Quality
Frequently related to inadequate VCR quality. S-VHS players with built-in TBC produce markedly better results than consumer-grade units.
4. When DIY is worth it vs. hiring a service
DIY restoration makes sense primarily in these circumstances:
- You have numerous tapes: With professional services charging $25-60 per tape, digitizing an extensive collection yourself can yield substantial savings.
- You enjoy technical projects: The process requires patience and a willingness to learn new skills.
- You want complete control: DIY allows you to decide precisely how your memories are preserved.
- Alternatively, professional services offer advantages worth considering:
- Time efficiency: Converting even a single tape takes hours of active work, including setup, troubleshooting, and editing.
- Quality assurance: Professional services use high-end equipment that typically exceeds what’s practical for home use.
- Fragile media handling: Damaged tapes risk further deterioration if mishandled during DIY conversion.
The decision ultimately hinges on balancing quality expectations against your budget, technical comfort level, and the time you’re willing to invest in preserving these irreplaceable memories.
Understanding the Complete VHS Video Restoration Cost
Diving into the financial side of preserving your memories reveals that the cost of VHS video restoration varies dramatically depending on your chosen approach. Many people underestimate what they’ll spend; let’s break down the real numbers for 2025.
1. DIY setup: $50–$200
At first glance, the DIY route appears budget-friendly. Basic USB capture devices start at just $20, making the project appear affordable. In reality, this initial purchase represents only a fraction of your total investment.
A proper DIY setup typically requires:
- A quality VCR ($50-$300, depending on model and condition)
- Appropriate cables (basic RCA vs. gold-insulated Monster cables for better quality)
- Storage space for large video files (30GB+ per hour for lossless captures)
Beyond these tangible costs, consider the substantial time investment. Each tape must be converted in real-time; 20 two-hour tapes would require a minimum of 40 hours of active conversion time, not including setup and troubleshooting.
For excellent quality restoration, the hardware costs start around $400 and can reach $1,200 for an ideal home setup. Even persistent bargain-hunters will struggle to assemble adequate equipment for less than $600-700.
2. App-based: Free to $10/month
Mobile applications offer the most economical entry point into VHS restoration. Most quality apps fall into one of two pricing models:
- Free with limitations: Basic functionality without cost, but restricted features
- Subscription-based: Complete access for monthly fees typically under $10
Be cautious with “free” apps that hide their actual costs. Some advertise as free but implement aggressive subscription models; one notorious example charges $30 weekly after a brief trial period.
Regarding value, app-based solutions make sense for occasional restoration projects or when working with already-digitized footage. Their affordability comes at the expense of processing power and enhancement capabilities compared to dedicated software.
3. Professional services: $25–$60 per tape
Professional VHS transfer services eliminate the hardware investment and technical learning curve while often delivering superior results. Current market rates generally fall between $15 and $35 per tape for standard services.
Service pricing follows tiered models based on included features:
- Basic packages: Simple digitization without enhancements ($15-$25/tape)
- Standard packages: Digital transfer with basic corrections ($25-$35/tape)
- Premium packages: Full restoration with multiple formats ($35-$60/tape)
Notable service providers maintain consistent pricing patterns:
- iMemories charges $14.99 per tape (sale price) with optional AI enhancement for an additional $4.99
- EverPresent offers tiered pricing from $21.99/tape for basic conversion to $45.99/tape for professional-grade restoration.
- Legacy Digital starts at $19.95 for tapes up to 2 hours in length.
Additional costs often include physical media (USB drives: $19.99-$79.99, DVDs: $9.99-$19.99) and cloud storage options ($49.99/year).
4. Factors that affect pricing: tape condition, length, and extras
Several key variables influence the final cost of your restoration project:
- Tape condition: Damaged tapes requiring repair or multiple passes command premium pricing
- Recording length: Longer recordings (4-6 hours) can double or triple the base price
- Special formats: Non-standard formats like PAL, SECAM, U-Matic, or Betacam typically incur $10-$20 surcharges
- Enhancement options: Color correction, noise reduction, and particularly AI enhancement add $5-$20 per tape.
- Output format: Digital-only delivery costs less than physical media like DVDs ($9.99-$19.99) or USB drives ($19.99-$79.99)
To calculate your total VHS video restoration cost accurately, multiply your per-tape price by your collection size; as a result, you’ll have a more realistic expectation. With this in mind, consider that a typical family collection of 10-15 tapes would cost $200-$900 through professional services, compared to a one-time DIY investment of $400-$1,200 plus your time.
VHS Video Restoration Cost in 2025: DIY vs. Professional Pricing Explained. Get the complete cost analysis, including hidden expenses, professional service comparisons, and money-saving strategies. Make informed decisions about your restoration budget with our detailed pricing breakdown. View our complete cost comparison analysis.
Use AI Video Restoration for High-Quality Results
Artificial Intelligence represents the cutting edge of VHS video restoration technology. Once considered futuristic, AI-powered enhancement tools now offer remarkable improvements to aging video footage that standard methods simply cannot achieve.
1. How AI improves resolution and clarity
AI video restoration utilizes sophisticated neural networks trained on vast datasets of high-quality and low-quality video pairs. These intelligent algorithms analyze each frame individually, identifying patterns and textures in low-resolution footage and reconstructing missing information. Unlike traditional methods, AI can:
- Remove noise, flickering, and digital artifacts while preserving natural sharpness
- Intelligently fill in missing details, resulting in sharper, more explicit images
- Upscale VHS footage from standard definition to HD, 4K, or even 8K resolution
- Fix interlacing issues that cause horizontal lines in digitized VHS content
The process works by having AI evaluate what a clean, sharp video should look like based on its training, enabling it to recognize damaged patterns and restore them accordingly.
2. Before vs. after: What to expect
Real-world results demonstrate AI’s capabilities. In one comparison, a raw VHS capture appeared grainy and washed-out, while the AI-remastered version showed dramatically improved clarity and color vibrancy. Expect these tangible improvements:
- Sharper facial features and improved texture details like hair strands and foliage
- More vibrant, accurately balanced colors that restore the original intended look
- Smoother playback with reduced jitter and stability issues
- Significantly reduced noise without the artificial “plastic” look common in basic filters
Remember that while AI can produce remarkable transformations, it “can’t do magic, you won’t get 4K Netflix quality out of a 240p VHS clip”.
3. Best AI tools: Topaz, HitPaw, AVCLabs
(i) Topaz Video AI
stands as the industry leader, featuring specialized models like Dione TV designed explicitly for enhancing analog sources, such as VHS. Its powerful upscaling capabilities and intelligent noise reduction make it ideal for serious restoration work, though it requires substantial computing resources.
(ii) HitPaw VikPea (formerly HitPaw Video Enhancer)
offers an accessible approach with its clean interface and watermark-free preview. It excels at enhancing facial details and colorizing black and white footage, but may sometimes produce over-smoothed results.
(iii) AVCLabs Video Enhancer AI
specializes in restoring extremely poor-quality video. Released in 2021 and continuously improved, it’s particularly noted for being the first tool to introduce advanced face detection and refinement specifically for video enhancement.
4. When AI is most effective
AI restoration truly shines in specific scenarios:
- When dealing with aged, noisy footage, where traditional filters create unnatural results
- For recovering detail in low-resolution VHS transfers that appear blurry
- When preserving footage with sentimental value that deserves long-term preservation
- For content containing faces, where AI’s facial recognition capabilities can dramatically improve clarity
For optimal results, consider using AI in conjunction with traditional video editing techniques. This hybrid approach addresses specific issues that AI alone may not fully resolve.
Combine Apps and Software for the Best Workflow
The magic happens when you combine different restoration methods rather than relying on a single approach. Restoration experts consistently achieve the best results by creating a multi-stage workflow that leverages the strengths of various tools.
1. Start with the app for quick cleanup.
Begin your restoration journey with mobile apps for initial improvements. Apps like PixVerse or CapCut AI offer immediate visual enhancements without technical complexity. Subsequently, use these applications to:
- Remove basic noise and static
- Apply preliminary color correction
- Stabilize obvious camera shake
- Create a cleaner foundation for deeper work
“Starting with mobile apps allows you to assess which tapes deserve more intensive restoration quickly,” notes one restoration expert.
2. Use VHS video restoration software for deeper enhancement
Once you’ve completed initial cleanup, dedicated software provides more substantial improvements. Professional tools offer precision typically unavailable in mobile applications. In this stage:
(i) Import your app-enhanced footage into VirtualDub or Avidemux
(ii) Apply specialized filters like Video DeNoise and Chroma Noise Reduction
(iii) Fix interlacing issues and dropped frames
(iv) Address color bleeding or inconsistent lighting
3. Add AI for final polish.
After conventional software enhancement, AI restoration tools deliver remarkable final improvements. Modern AI can intelligently upscale resolution while preserving natural detail. Consider utilizing:
- Topaz Video AI for faces and important details
- AVCLabs Video Enhancer AI for severe damage repair
- UniFab’s advanced AI features for refining colors
“Combining these approaches creates a workflow that addresses each restoration challenge with the optimal tool,” explains a digital preservation specialist.
4. Real-world example: VHS to YouTube under $50
A practical, budget-friendly workflow might look like:
(i) Capture footage using a basic USB converter ($20-35)
(ii) Perform initial cleanup with the free CapCut mobile app
(iii) Use free OBS Studio and VirtualDub for deeper filtering
(iv) Apply final touches with AVCLabs’ monthly subscription ($39.95)
(v) Export directly to YouTube in enhanced quality
This hybrid approach delivers professional-quality results without the $299 investment in premium software, simultaneously preserving memories and maintaining budget control.
Final Thoughts
Your VHS tapes are deteriorating with every passing day. Magnetic tape isn’t built to last forever, but modern tools can help. Whether you’re using mobile apps, free software, or pro tools, there’s a method for every skill level. You now have seven powerful ways to bring those memories back to life.
Costs vary, but restoration doesn’t have to be expensive. Mobile apps and free tools offer quick, affordable fixes, while premium software or DIY setups deliver studio-level results. A hybrid workflow, app first, then software, topped off with AI, gives you control, saves time, and produces stunning transformations with minimal technical headaches.
Don’t let fear of tech hold you back. Even basic restorations can breathe new life into old footage. Start with what fits your comfort zone and budget. Thanks to 2025 technology, VHS video restoration is easier and more powerful than ever. Your family’s memories deserve a second life. Start restoring them today.
FAQs on VHS video restoration
Q1. What’s the most cost-effective way to digitize multiple VHS tapes?
For large collections, a DIY setup is often the most economical. You can get started with a basic USB capture device for $20-$35, use free software like OBS Studio for capturing, and apply enhancements with affordable or free tools. This approach can save significantly compared to professional services, which typically charge $25-$60 per tape.
Q2. How does AI technology improve VHS video restoration?
AI-powered tools like Topaz Video AI can dramatically enhance VHS footage by removing noise, improving clarity, and even upscaling resolution. These algorithms analyze each frame to reconstruct missing details, fix color issues, and reduce artifacts. While AI can’t perform miracles, it can noticeably improve the quality of old VHS recordings beyond what traditional methods achieve.
Q3. What equipment do I need for a home VHS restoration setup?
A basic home setup requires a VCR (preferably a high-quality S-VHS model), a capture device to convert analog signals to digital, appropriate cables (RCA or S-Video), and a computer with sufficient storage and processing power. For better results, consider adding a time base corrector (TBC) to improve signal stability.
Q4. Can mobile apps effectively restore VHS footage?
Mobile apps like PixVerse and CapCut AI offer quick enhancements and are great for initial cleanup or social media sharing. While they have limitations compared to desktop software, they’re user-friendly and can improve basic issues like noise and color fading. They’re best used as a starting point before applying more advanced restoration techniques.