Watercolor pet portraits have become a timeless way to capture your furry friend’s personality with vibrant colors and expressive brushstrokes. Not only is creating these artistic treasures enjoyable, but it can also transform into a rewarding career path, as evidenced by artists who have completed more than 150 commissioned pet portraits to date.
Pet watercolor portraits offer a unique charm that transcends trends, making them cherished keepsakes for years to come. Many artists enjoy combining their love for animals and art to create engaging portraits that depict the personalities of their favorite canines. Thanks to the versatility and timeless quality of watercolor, it’s no wonder this medium has become one of the most popular choices for custom watercolor pet portraits.
Some artists have even found success beyond personal satisfaction, turning their hobby into a full-time career by earning income from watercolor pet art. For those considering commissioning artwork, learning how to choose the perfect pet portrait artist ensures you find someone who truly understands your vision. In this guide, you’ll discover five effective ways to capture your pet’s spirit in brushstrokes, from selecting the perfect reference photo to mastering techniques that bring your pet portraits in watercolor to life.
Gather your tools and prepare your space.
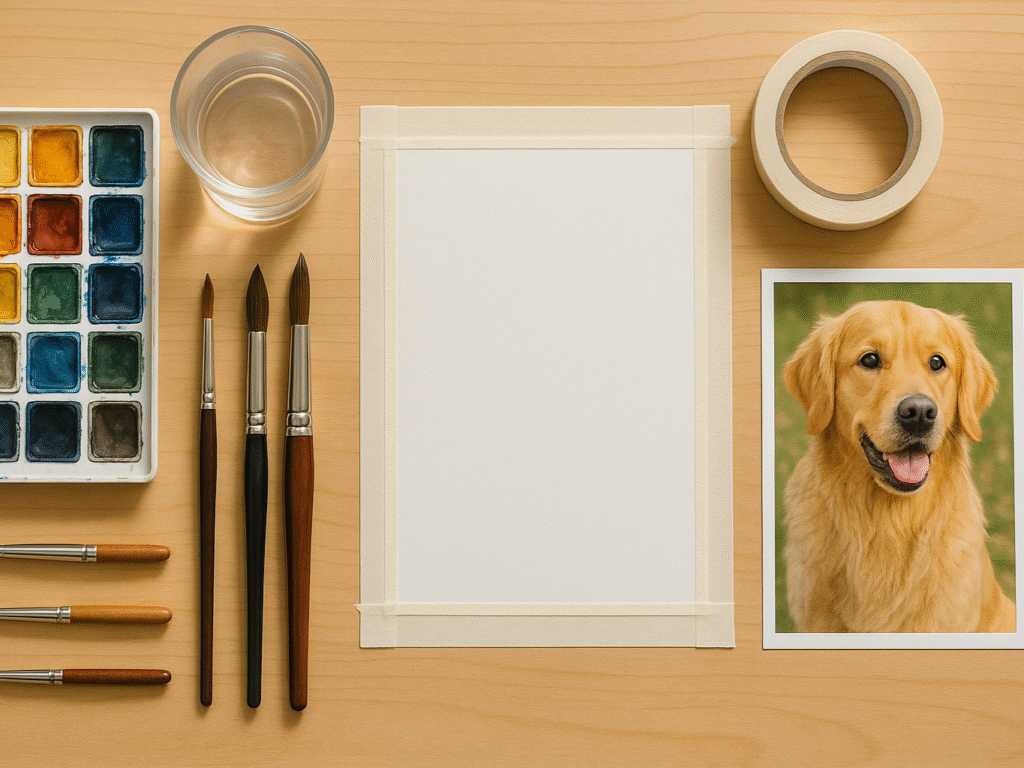
Before creating your pet’s portrait, gathering the right tools and setting up a proper workspace will significantly impact the final artwork. The quality of your supplies and environment can make the difference between a frustrating experience and a rewarding artistic journey.
1. Essential supplies for watercolor pet painting
Creating beautiful watercolor pet portraits requires specific materials designed for this delicate medium. Here’s what you’ll need to get started: While watercolor offers unique translucency and flow for pet portraits, it’s worth noting that different mediums each have distinct advantages. You can explore oil, digital, and watercolor comparisons to understand which one best suits your artistic goals.
- Watercolor paints: Available in pans or tubes. Essential colors for pet portraits include cobalt blue, yellow ochre, burnt sienna, and burnt umber.
- Palette: Use a non-porous surface, such as a plastic lid or a proper palette with wells, for better color mixing.
- Water containers: Use two jars, one for rinsing and one for clean water, to keep colors vibrant. Glass jars, such as mason jars, work best.
- Paper towels: Needed for blotting brushes, fixing mistakes, and adding texture. Blue automotive shop towels are highly recommended.
- Pencil, eraser, and sharpener: Used to sketch outlines before painting begins.
- Masking fluid: Helps preserve white areas, such as fur or whiskers, in watercolor pet portraits.
- Optional extras: Masking tape, pipettes, and gum Arabic can improve precision and paint flow.
The quality of these supplies directly affects your painting process and results. While it’s tempting to economize on materials when starting, investing in higher-quality items, particularly paper, will dramatically improve your watercolor pet portraits.
2. Choosing the right paper and brushes
Perhaps surprisingly, paper quality is one of the most crucial factors in successful watercolor painting. Many professional artists consider paper more important than paint or brushes when it comes to watercolor pet portraits.
(i) Watercolor Paper Selection:
The best watercolor paper is made from 100% cotton, is pH neutral, and is acid-free. Cotton is naturally white, absorbent, soft, and strong, making it ideal for custom watercolor pet portraits and professional watercolor work. Papers labeled “archival quality” won’t affect the paint and don’t fade over time, ensuring your pet portrait remains vibrant for years.
Watercolor paper comes in three main textures:
- Cold press (most popular): Has a slightly textured surface that provides reasonable control and versatility
- Hot press: Smooth surface ideal for fine details and vibrant colors
- Rough: Highly textured, perfect for creating interesting effects in landscapes or backgrounds
The paper’s weight is equally important. Heavier papers (300 gsm/140lb and above) can hold more water without buckling, while lighter papers may require stretching before use. For beginners creating watercolor pet portraits, 140lb/300 gsm cold-press paper offers an excellent balance of quality and manageability.
(ii) Brush Selection
Watercolor brushes are specifically designed for high absorbency, holding more paint and water than brushes for other mediums. It allows for longer strokes and smoother application, essential when painting fur textures in your pet portrait.
To start, focus on these essential brushes:
- A large round brush (size 6-8) for washes and larger areas
- A medium round brush for general work
- A small round or rigger brush (size 2-3) for fine details like whiskers and eye highlights
Brush materials range from synthetic to natural animal hair (like sable or squirrel) or blends. While professional artists often prefer natural hair brushes for their superior water-holding capacity, quality synthetic brushes can be excellent alternatives, especially for beginners.
3. Setting up a distraction-free workspace
Your workspace setup significantly impacts your painting experience and the quality of your watercolor pet portraits. Fortunately, watercolor painting doesn’t require much space; a dining table or a small desk works perfectly well.
(i) The foundation of your workspace:
The heart of your watercolor setup is your table or desk. It doesn’t need to be large; simply stable and at a comfortable height is sufficient to prevent strain during longer painting sessions. Some artists invest in adjustable standing desks or angled drawing boards, which offer versatility and ergonomic benefits for your back and posture.
Your chair deserves equal consideration. It should be comfortable enough for extended painting sessions without being so relaxing that your posture suffers. An ergonomic chair is ideal, though taking regular breaks to stand and stretch is essential regardless of your seating choice.
(ii) Lighting considerations
Sufficient natural lighting is invaluable for accurate color perception. When creating pet portraits in watercolor, the colors should appear lifelike and true to your pet’s natural appearance. If natural light isn’t consistently available, invest in a high-quality daylight lamp that simulates it. Position the lamp to illuminate your workspace evenly, ideally from your non-dominant side to minimize shadows.
(iii) Organization tips
Keep your watercolor supplies within arm’s reach to maintain creative flow. Arrange your palette, water jars, and brushes nearby, with paper towels readily accessible for quick blotting. Having reference photos of your pet visible, whether printed or on a screen, allows you to capture details accurately.
Consider using a flat board to mount your paper. It provides multiple advantages:
- Helps keep the paper flat while working
- Allows you to tilt the board when working with wet paint
- Makes it easier to rotate your work for comfortable brush control
For securing paper to your board, use masking or drafting tape at least 1 inch wide. Unlike artist tape, which may be too low-tack, masking tape provides better adhesion for watercolor work while still removing cleanly.
Creating a dedicated, well-organized space specifically for your watercolor pet portrait projects encourages regular practice and creative focus. Even if you must share or temporarily convert a space in your home, establishing a consistent setup routine helps transition into your creative mindset more quickly and effectively.
Remember that your workspace should inspire rather than intimidate. Start with the essentials and gradually refine your setup as you discover what works best for your unique painting style and preferences.
How to Choose the Perfect Pet Portrait Artist for Your Furry Friend: Ready to commission a professional? Discover expert tips for finding the ideal artist who understands your pet’s personality and delivers stunning results. Learn which questions to ask, which red flags to avoid, and how to ensure your investment becomes a treasured keepsake. Learn More.
Select and study your pet photo.
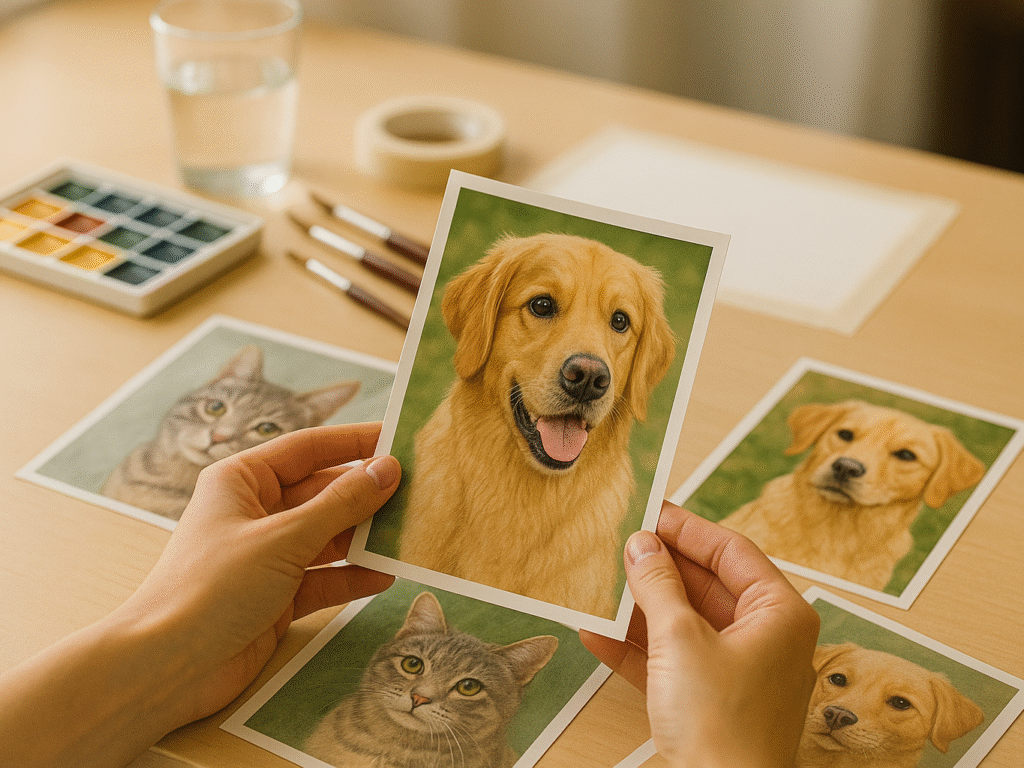
The success of your watercolor pet portrait hinges heavily on one critical element: the quality of your reference photo. Even the finest brushes and premium paints can’t compensate for a poor-quality image. Selecting the perfect photo requires careful consideration, as it provides the essential foundation for capturing your pet’s unique spirit in watercolor.
1. What makes a good reference photo
The quality of your reference photosignificantly affectsn the final result of your watercolor pet portraits. Professional artists stress that a clear, well-lit image is the foundation of any successful painting. A good photo helps convey your pet’s unique features and personality.
Natural light is ideal for watercolor pet portraits. It reveals the actual colors, markings, and fur texture. High-resolution images are essential for capturing fine details, such as eyes and whiskers. Avoid blurry or poorly lit photos, as they limit artistic accuracy.
When considering composition, aim for these qualities in your reference photo:
- Close-up shots that clearly show facial features, particularly the eyes
- Photos taken at eye-level rather than looking down at your pet
- Images where both eyes and ears are visible when possible
- Shots that capture your pet’s natural posture and personality
- Clear visibility of distinctive markings or fur patterns
The eye-level perspective proves particularly important. Many pet owners instinctively photograph their pets from above, creating an awkward “large head, small body” perspective that can be challenging to translate into a balanced watercolor portrait. Instead, get down to your pet’s level for more engaging and proportionally accurate images.
Additionally, consider gathering multiple reference photos from different angles. This approach helps you build a comprehensive understanding of your pet’s features and provides alternatives if specific details aren’t precise in your primary reference. Professional artists often recommend providing several photos when commissioning custom watercolor pet portraits, as pets can look remarkably different depending on lighting, setting, and grooming status.
2. Understanding light, shadow, and form
Light and shadow serve as the foundation for creating dimensional, lifelike watercolor pet portraits. Initially, understanding how light interacts with your pet’s form helps translate a flat photo into a three-dimensional painting.
When examining your reference photo, identify the direction of the primary light source. Is light coming from above, the side, or perhaps from multiple sources? Subsequently, locate three key areas that define form: the light side (including highlights and halftones), the shadow side (including form shadows and reflected light), and cast shadows.
Single-source lighting often provides the most precise definition between light and shadow, making it ideal for beginners. This lighting creates distinct shadows that help artists more easily establish form in watercolor pet portraits. Look for photos where your pet is illuminated by one predominant light source, such as window light or a single lamp.
The play of light across your pet’s fur reveals volumes about their three-dimensional structure. Pay attention to how:
- Highlights indicate where light directly strikes the form
- Halftones create gentle transitions between light and shadow
- Shadow cores mark the darkest areas of form shadows
- Reflected light subtly illuminates portions of the shadow side
According to experienced artists, these subtle transitions between light and shadow create the illusion of fur texture and volume in watercolor pet portraits. Notably, different fur types interact with light in unique ways: silky, short fur reflects light differently from fluffy, long fur, which requires different watercolor techniques to capture these qualities.
When studying your reference photo, look beyond just the obvious light and dark areas. Search for subtle color variations in shadows, as they are rarely pure black and often have cool undertones that add depth to your watercolor pet portrait.
Renaissance Pet Portraits: Transform Your Pet Into Timeless Royalty: Give your beloved companion the royal treatment they deserve! Discover how Renaissance-style pet portraits blend classical elegance with your pet’s distinctive personality. Discover techniques, styling options, and artistic approaches that create majestic, museum-worthy artwork celebrating your furry nobility. Discover Renaissance Portraits.
3. Identifying emotional cues in the image
The most powerful watercolor pet portraits go beyond accuracy; they capture your pet’s personality and spirit. Choosing a reference photo that captures your pet’s natural expressions and behaviors is key to creating an emotionally meaningful, truly memorable piece of art.
Look for emotional cues in the photo: clear, highlighted eyes, expressive posture, and familiar gestures. A direct gaze adds intimacy, while body language, such as a wagging tail or a relaxed pose, conveys mood. These subtle details help artists create watercolor pet portraits that feel personal, lively, and full of heart.
When creating memorial portraits or using limited photo references, emotional cues become essential. Providing multiple photos and sharing your pet’s personality traits allows the artist to fill in emotional gaps, ensuring the final watercolor pet portrait feels genuine and heartfelt, just like life. For those honoring a beloved companion who has passed, specialized pet memorial portraits offer a healing way to celebrate their legacy with sensitivity and care.
Follow a step-by-step painting process.
Creating beautiful custom watercolor pet portraits requires a methodical approach and careful attention to detail. The actual painting process requires patience, attention to detail, and strategic layering to capture your pet’s unique essence. Following these organized steps will help transform your blank paper into a vibrant, lifelike representation of your beloved companion.
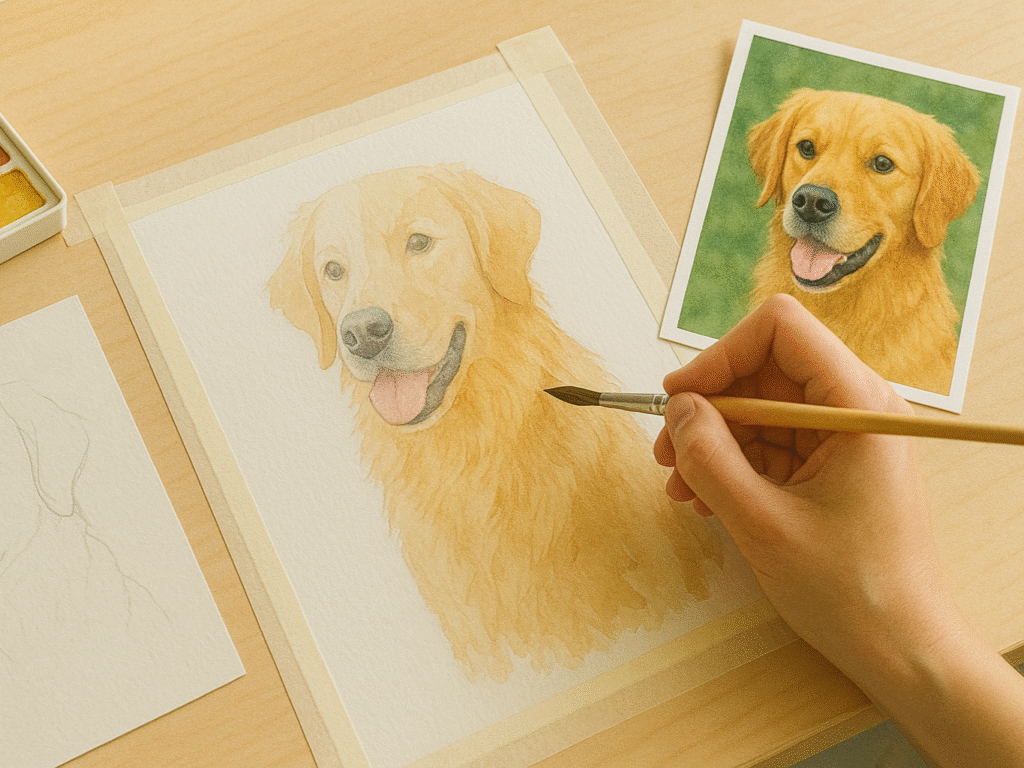
1. Sketching the outline with accuracy
Every exceptional watercolor pet portrait begins with a solid drawing foundation. As one experienced artist notes, “A great painting starts with a great drawing”. This initial sketch serves as your roadmap, mapping out your pet’s facial features and establishing the proper proportions that will guide your entire painting process.
For many artists, creating an accurate preliminary sketch represents the most challenging yet crucial phase of the entire painting process. Initially, consider these practical approaches:
- Sketch on separate paper first, then transfer to watercolor paper to protect its delicate surface
- Keep your preliminary lines light to prevent muddying the paint later
- Focus on capturing accurate proportions rather than detailed shading
- Use tracing paper for transferring complex outlines if needed
When transferring your sketch to watercolor paper, place tracing paper over your reference photo, draw the major lines, then flip the tracing paper and shade the back with pencil. It creates a transfer sheet that lets you trace your outline directly onto watercolor paper.
Accuracy matters tremendously at this stage; even minor proportion errors can significantly impact how recognizable your pet appears in the finished portrait. Pay particular attention to the spacing between features, the relationship between ears and eyes, and the overall head shape unique to your pet’s breed.
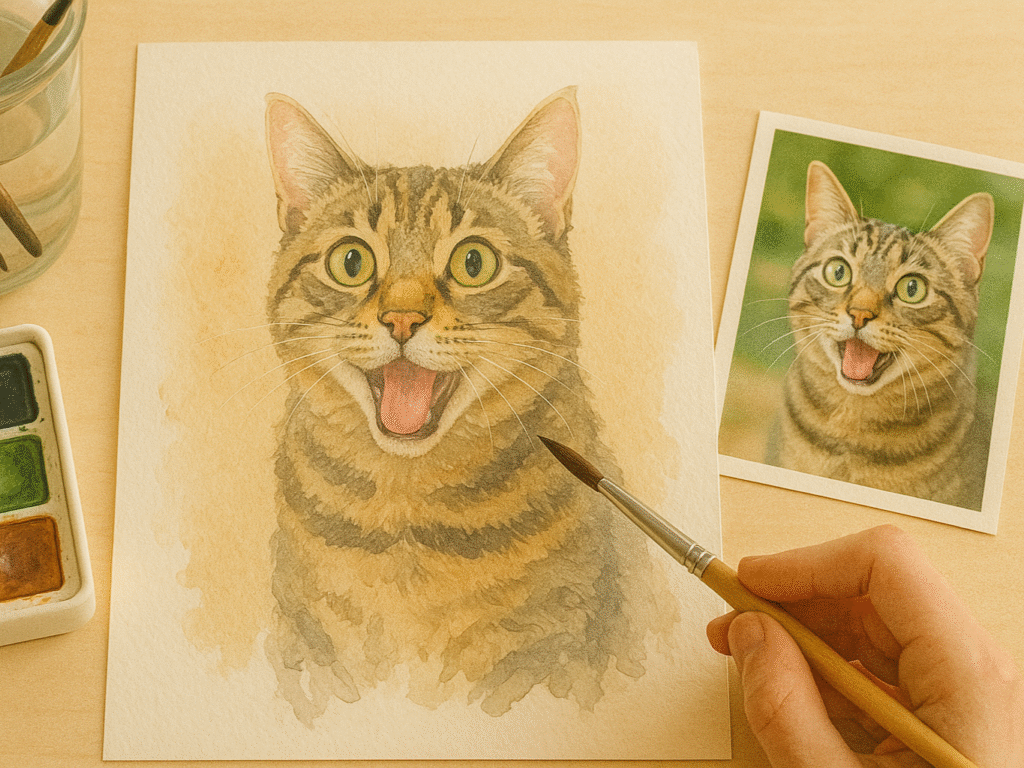
2. Painting the eyes first to set the tone
The eyes function as the emotional center of pet portraits in watercolor; they establish a connection and bring personality to your painting. Many professional artists prioritize painting the eyes early in the process, as they “hold the personality and emotion of the animal.”
Once your sketch is complete, begin by applying a light wash of color using the wet-in-wet technique to create your first layer. Afterwards, move directly to painting the eyes, leaving them untouched by the initial wash. This approach offers several advantages:
- It motivates you as you see your pet’s expression emerge early
- It helps establish the tonal range for the rest of the portrait
- It creates a focal point that guides your subsequent color choices
For painting lifelike eyes, follow this sequence:
First, apply a light yellow wash to the iris, avoiding the highlight areas altogether. It creates a luminous quality that makes eyes appear to glow from within. Following that, add a second layer of color (often burnt sienna for brown eyes) while the first layer is dehydrated. It builds depth without muddying the colors.
The pupil requires special attention; use your darkest mix carefully, applying it precisely while preserving the highlight. Many artists recommend using a tiny round brush (size 0 or 1) for this detailed work. Generally, eye highlights should remain untouched, paper white throughout the entire painting process to create that spark of life.
3. Building up fur with layered washes
Achieving realistic fur texture requires patience and a methodical layering approach. Initially, start with an underpainting, applying the lightest value visible in your pet’s fur across the entire shape. It prevents the white paper from showing through later layers and establishes your base tone.
Following the underpainting, create pale fur markings as a map to guide your subsequent layers. It is essential to realize that these first strokes should be:
- Applied with a consistency similar to thin milk
- Spaced apart so the underpainting remains visible
- Staggered rather than placed in straight rows
- Varied in length to create natural-looking fur
Throughout this process, always paint fur strokes in the direction of hair growth, while carefully observing your reference photo. For fluffy dogs, try layering multiple shades, whites, grays, yellows, and browns to create depth and realism that brings your pet’s coat to life.
As you build additional layers, modify your technique based on your pet’s fur type:
- For short-haired pets: Use quick, short brushstrokes in overlapping layers
- For long-haired pets: Apply longer, thinner strokes following fur chunks
- For textured fur: Try spreading out your brush bristles for a toothy effect
Before adding your final detailing layer, consider applying a thin color glaze to the fur area. It slightly smooths the texture, unifies the values, and enhances the three-dimensional quality of your pet’s form.
Oil Pet Portraits on Canvas: Hand-Painted Heirlooms to Cherish Forever: Want lasting artwork that becomes a family heirloom? Oil paintings offer unmatched durability and rich texture. Learn about oil portrait techniques, canvas selection, and why many collectors prefer oil over other mediums for their most treasured pet commemorations. Explore Oil Portraits.
4. Adding background elements for depth
The background of your pet portrait significantly impacts the overall composition. Many artists recommend working from background to foreground to save time and ensure a smooth layering process. Your background choices should complement your pet without competing for attention.
Popular background approaches for pet portraits include:
- Semi-abstract color tones that enhance your pet’s coloring
- Simplified versions of the original setting, removing clutter
- Abstract color fields that create visual interest
- Simple shadows to ground your pet without distraction
For pets with light-colored fur, consider using colors from your subject in an abstract background to create visual harmony. Alternatively, with dark-colored pets, a simple gradient from warm gray to cool gray can provide elegant contrast.
Deciding how your pet interacts with the background adds depth to watercolor pet portraits. A soft horizon line grounds the subject, while wet-in-wet techniques create gentle transitions. Build your painting gradually, using the reference photo to guide values, colors, and emotional detail.
5 ways to capture your pet’s spirit in brushstrokes
Beyond technical skill, the true magic of pet watercolor portraits lies in capturing your companion’s unique spirit and personality. Once you’ve mastered the basic techniques, these five approaches will help infuse your painting with the essence that makes your pet special.
1. Focus on the eyes for emotional connection
The eyes truly serve as windows to your pet’s soul in watercolor pet portraits. Professional artists often say that capturing the “spark of life” in the eyes is what makes the difference between a flat painting and one that feels alive. Indeed, this subtle quality creates an emotional bridge between the viewer and the portrait.
Start by preserving the brightest white highlight, the reflection of light that makes eyes appear wet and vibrant. This tiny detail, often no larger than a pinhead, should remain untouched throughout your painting process. Around this highlight, build layers of transparent color to create depth.
Pay attention to your pet’s unique eye shape. Dogs with round, expressive eyes require different treatment from cats with almond-shaped, mysterious eyes. For dogs with soulful expressions, apply slightly warmer tones to create that characteristic “melting” quality. For cats, consider cooler tones to achieve their characteristic intensity.
Remember that eye direction has a dramatic influence on emotional impact. Eyes looking directly at the viewer create an intimate connection, whereas a sideways glance suggests curiosity or playfulness. Hence, subtle positioning adjustments can significantly alter the perceived personality of your watercolor pet portrait.
2. Use color to reflect personality
Color choices extend far beyond merely matching your pet’s visible fur tones. In essence, they serve as powerful tools for expressing personality traits in custom watercolor pet portraits.
For energetic, playful pets:
- Incorporate warmer undertones (yellows, oranges) even in neutral fur
- Use a higher contrast between light and shadow areas
- Include touches of vibrant complementary colors in background elements
Alternatively, for calm, dignified pets:
- Choose cooler undertones (blues, purples) in shadow areas
- Opt for more harmonious, less contrasting color schemes
- Apply more subtle color transitions throughout
Despite photographs that mainly show browns and grays, expert watercolor pet artists recognize that animal fur has numerous color variations. Upon closer examination, you might discover hints of blue in black fur or touches of purple in shadows. These subtle color choices, in contrast to literal interpretations, inject personality into your watercolor pet painting.
Furthermore, the background colors you choose can significantly enhance how your personality is portrayed. A serene blue background complements a thoughtful pet, whereas warm orange tones amplify the spirit of an energetic companion. For those drawn to more classical approaches, Renaissance pet portraits demonstrate how traditional color palettes and formal compositions can elevate your pet to regal status.
3. Let posture guide the composition
Your pet’s natural way of holding itself reveals volumes about its character. Above all, carefully observe their distinctive posture and incorporate these observations into your watercolor pet portrait composition.
For confident pets, emphasize an upright posture, elongated necklines, and proudly positioned ears. In comparison, for gentle and shy pets, softer curves and slightly lowered head positions convey their tender nature. Likewise, the angle of the ears, forward, relaxed, or alert, provides immediate personality cues worth emphasizing.
Professional artists often recommend adjusting compositional elements to reinforce personality. A dignified pet might benefit from a centralized, symmetrical composition with plenty of negative space. Correspondingly, a playful character might be better served by a dynamic, off-center placement that suggests motion.
Occasionally, a slight exaggeration of characteristic posture elements can enhance personality recognition. It doesn’t mean creating caricatures, merely emphasizing what makes your pet unique, perhaps their distinctive head tilt or the way they hold their paws.
4. Add playful or regal accessories
Thoughtfully chosen accessories provide excellent opportunities to emphasize your pet’s character in watercolor pet art. Nevertheless, discretion remains key; select items that genuinely reflect your pet’s personality rather than imposing human preferences.
For playful pets, consider incorporating their favorite toy, painted with loose, energetic brushstrokes. For dignified pets, a subtle collar or bandana in muted tones can enhance their natural elegance. Undeniably, these small additions provide context that amplifies personality traits already present in your pet’s expression.
The painting technique used for accessories matters extensively. Apply more precise brushwork for accessories worn by dignified pets, whereas looser, more spontaneous strokes better complement playful personalities. This technical variation further enhances the character portrayal in your custom watercolor pet portrait.
5. Use loose strokes to suggest movement
Motion represents personality in action, making brushstroke technique vital for capturing your pet’s dynamic spirit. Ultimately, how you apply paint can communicate energy levels as effectively as the subject matter itself.
For active, energetic pets, use:
- Quick, decisive brushstrokes with varied pressure
- Directional marks following muscle movement
- Deliberate “bleeding” of colors at edges to suggest motion blur
For calm, serene pets, adapt by applying:
- More controlled, methodical strokes
- Gentler transitions between colors
- More defined edges with minimal bleeding
The wetness of your brush has a dramatic impact on how movement appears in watercolor pet portraits. Wetter brushes create soft, flowing edges that suggest movement, whereas drier brushes produce more controlled, static effects. Experiment with both to find the perfect balance for your pet’s energy level.
In watercolor pet painting, leaving certain areas less defined, particularly extremities like paw tips or tail ends, creates a sense of natural movement that brings your portrait to life while showcasing your pet’s unique spirit through brushstrokes.
Pet Memorial Portraits: Healing Tributes to Celebrate Their Legacy: Honor your beloved companion’s memory with a touching tribute. Memorial portraits provide comfort during difficult times while celebrating the joy your pet brought to your life. Discover thoughtful approaches, symbolic elements, and the healing benefits of commemorative artwork. Create your own Memorial Art.
Refine and personalize your portrait.
The final refinement stage often distinguishes amateur watercolor work from professional-quality pet portraits. After establishing your basic painting, these enhancement techniques will add depth, dimension, and personality to your artwork.
1. Glazing and lifting techniques
Glazing involves applying transparent layers of diluted paint over dry areas to create luminosity and depth in your watercolor pet portrait. For this technique, mix your paint with transparent medium to create a translucent wash. Apply this thin layer over previously painted areas that need deeper tones or color adjustments. Each glaze adds subtle richness while allowing the underlying layers to show through, creating the characteristic watercolor glow. This approach works particularly well for adding depth to shadowed fur areas or enriching eye color.
Meanwhile, lifting allows you to remove color from your watercolor pet painting. To use this technique, wet the area you want to lighten with clean water, wait about 30 seconds, then gently dab with a paper towel or tissue. This method proves invaluable for creating fur texture, softening edges, or correcting minor mistakes. Ordinarily, lifting works best on quality papers that maintain their sizing even after multiple washes.
2. Using masking fluid for highlights
Masking fluid temporarily protects areas of your paper from paint, making it perfect for preserving whites in your watercolor pet portraits. Apply it with an old brush or a color shaper (a rubber-tipped tool) to areas that should remain white, such as whiskers, eye highlights, or light fur patterns. After the fluid dries completely, paint freely over these areas, knowing they’ll remain protected.
After completing your painting, gently rub off the masking fluid with your finger or a rubber eraser in a side-to-side motion. Although masking fluid can lift some color when removed from previously painted areas, this technique creates clean, crisp highlights that are impossible to achieve with other methods. For white fur textures, try spattering masking fluid with an old toothbrush before applying background washes.
3. Adding pen or ink for crisp details
Ultimately, combining watercolor with fine-line pen work creates a distinctive illustrative effect in pet portraits. After your watercolor is completely dry, use waterproof pens or fine liners to add whiskers, fur texture, or eye details that require absolute precision. This mixed-media approach adds definition while maintaining the softness of watercolor.
Start with lighter areas using a brown or sepia pen rather than black for a softer, more blended effect that blends better with your painting. Work from light to dark, gradually building detail. Remember that less is more; strategic pen strokes in key areas often create more impact than overworking the entire portrait with ink details. While watercolor mixed with pen work creates distinctive effects, some artists prefer the rich texture and permanence that oil portrait paintings on canvas provide for their most treasured family heirlooms.
Oil vs. Digital vs. Watercolor: Which Pet Portrait Style Wins?: Confused about which medium suits your needs? Compare the soft elegance of watercolor, the rich texture of oil, and the modern versatility of digital. Get expert insights on costs, durability, customization options, and which style best captures your pet’s unique personality and your artistic vision. Compare Portrait Styles.
Final Thoughts
Watercolor pet portraits beautifully capture the spirit of your beloved companion. By using quality materials, setting up a focused workspace, and choosing strong reference photos, you lay the foundation for a successful painting. From sketching to layering textures, each step helps translate your pet’s personality onto paper with precision and care.
Once the basics are mastered, five creative techniques elevate your artwork. Expressive eyes serve as emotional focal points, while color choices extend beyond fur tones to reflect individual personality. Posture, accessories, and varied brushstrokes further enhance the emotional depth, making each portrait feel truly personal and alive.
Finishing touches, such as glazing, lifting, and detailing, transform a good piece into a standout one. Take your time; these final steps add polish and professionalism. Whether you’re honoring a furry friend or building an art career, practice and emotional connection will help you create a timeless tribute that reflects both soul and skill.
FAQs on Watercolor Pet Portrait
Q1. What are the essential supplies for watercolor pet painting?
To create watercolor pet portraits, you’ll need artist-grade watercolor paints, cotton paper, a palette, water containers, soft brushes, a pencil, an eraser, masking fluid, and extras such as gum Arabic and masking tape for enhanced control and effects.
Q2. Why is paper quality important in watercolor pet portraits?
For professional watercolor pet portraits, high-quality 100% cotton paper is key. It provides excellent absorbency, prevents warping, and enhances color vibrancy, ensuring your finished artwork looks vivid, durable, and ready for framing or gifting.
Q3. How can I choose the best reference photo for my pet portrait?
To create stunning pet portraits in watercolor, use high-resolution photos taken in natural light. Look for sharp facial features, good contrast, and clear eyes, which help the artist accurately capture your pet’s spirit and expression.
Q4. What techniques help in capturing the eyes in pet portraits?
In watercolor pet portraits, the eyes are vital. Use multiple transparent layers, preserve bright highlights, and apply delicate brushstrokes to achieve a smooth, refined effect. These details bring depth and emotion, making your pet’s eyes lifelike and emotionally engaging.